Loading...
 Components and operation principle of Salto
 |
||||||||
|
Description of components by function
|
Non-functional Products
Products with stopper function
Products with automatic closing function
|
|||||||
|
Door Structure
|
When installing the outer door
When installing the inner door
|
|
Door Structure
|
|
|||||||||||||||||||||||||
| Safety accidents in the home | Features of Angel Finger |
|---|---|
| Components and operation principle of Salto |
Product composition of safety door locks |
|
|---|
|
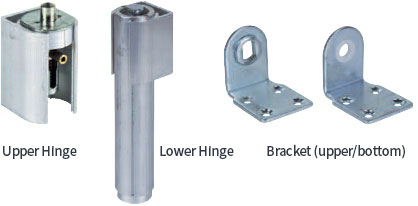
Description of components by function
Non-functional Products
|
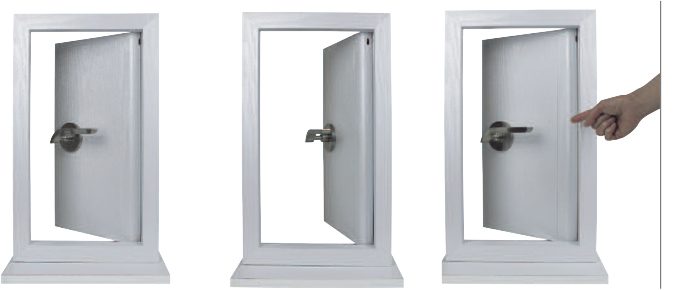
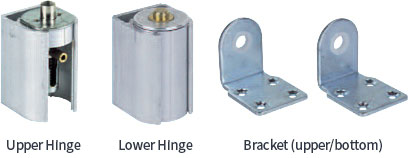 After the existing hinge is finished with a curved cap to prevent hand injuries, the hinges are installed in the upper and lower centers of the door to provide beautiful design and prevent sagging of the door. |
|
Products with stopper function
|
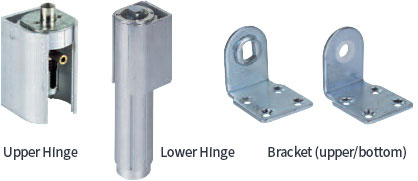 It moves as smoothly as a general hinge, and when the door abruptly closes due to an external shock, it automatically stops to prevent accidents. |
|
Products with automatic closing function
|
|
When the door is opened, the stopper function holds the door at 105 degrees to prevent an abrupt door closing caused by the wind. The door closes slowly and automatically, making it further safer in use. |
|
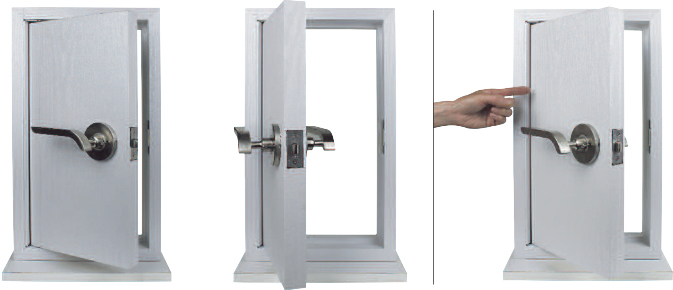
Door Structure
When installing the outer door
|
 |
|
When installing the inner door
|
 |
| Door Structure |
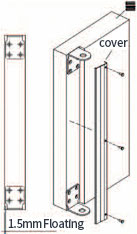 |
| Assembly of the frame Place the brackets 1.5mm above and below the frame and fasten them as shown in the picture. After the bracket is fixed, put the cover on and gently lock the cover with the four pieces to prevent the cover from bending. Make sure to cut the cover to be 5mm longer than the door's height before covering it. |
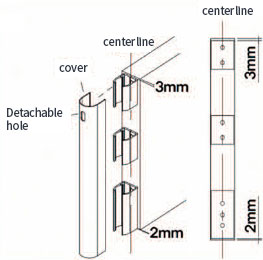 |
| Assembly of the door Mark the center of the actual door, place the hole in the holder on the center line, and fasten it with screws. (Note: make sure to attach the upper part by leaving 3mm gap, and the lower part 2mm gap as shown in the picture) Floor holders consist of non-functional holders (for 2 holes) and functional holders (for 3 holes). Put on the cover (Cut the bottom to be at the same height as the door except the holes). |
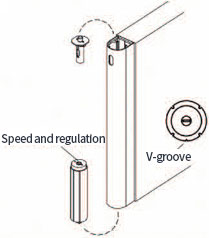 |
| Assembly of the cover and functional parts On the upper part, insert the handle into the holder according to the position of the hole. On the lower part, insert the functional part (non-functional buffering/automatic closing) so that the V-shape groove faces the front. |
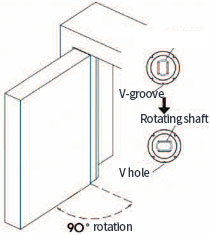 |
| Completion of the door Non-functional items is used without adjustment The functional (non-functional buffering/automatic closing) rotates the hinge axis 90° like a straw to be positioned at a right angle to the door. Fit the door into the lower bracket of the door in the position as shown in the picture below (regardless of left and right), and lower the upper pin to complete the assembly (Use a ballpoint pen or pin). When needing to adjust the speed, disassemble only the hinge to adjust the valve. |